
Did you know that...
Start your integration today, and finish it today, it's as simple as that.
Start your integration today, and finish it today, it's as simple as that.


Si quieres recibir pagos en tu sitio web de manera simple, rápida y sencilla, nuestro Express Checkout te permite lograrlo, sigue nuestro tutorial y en pocos minutos tendrás activo y funcional tu botón de pago.
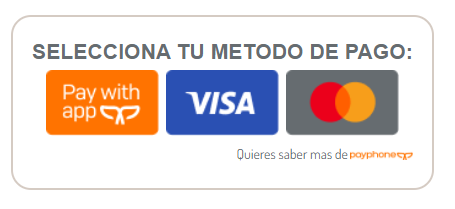
El Express Checkout es la manera más rápida de integrar el botón de pagos Payphone, usando código HTML y Javascript el cual te permite recibir pagos con tarjetas de crédito y débito Visa y Mastercard , además de tarjetas de regalo y saldo Payphone de tus clientes usando nuestra app.
Para recibir pagos con nuestro gateway solo debes seguir estos sencillos pasos:
Para implementar el botón de pagos debes cumplir ciertos requisitos que dividimos en dos categorías: Requisitos Comerciales y Requisitos de Desarrollo.
Ingresa en tu página Payphone Business, e inicia sesión con el ruc, correo y contraseña, (si no tienes acceso, el administrador de la empresa puede entrar y crear tu usuario) y dirígete a la sección de «Usuarios» a continuación selecciona «Crear Usuario»:
Presiona en «Usuarios» seguido de «Crear usuario»
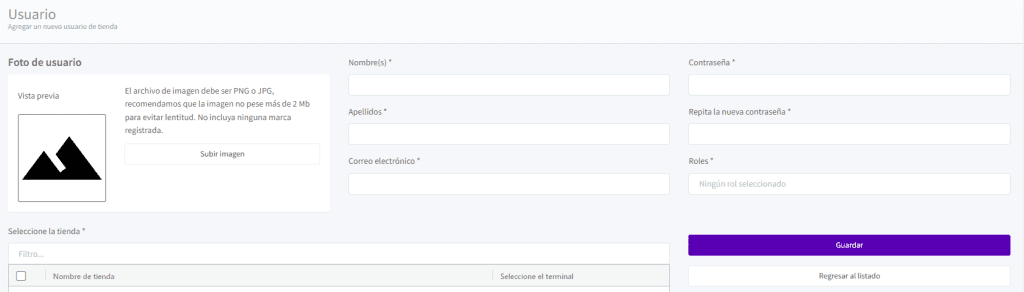
Ingresa todos los datos del desarrollador en el formulario, no olvides que en el campo «Roles» debes ingresar «Desarrollador». (El administrador debe entregarel correo electrónico y la contraseña ingresadas)
Con este proceso listo, el usuario desarrollador puede iniciar la implementación.
Configurar el ambiente de desarrollo te permite tener un control total sobre las transacciones efectuadas a través de Payphone. Por favor sigue los siguientes pasos:
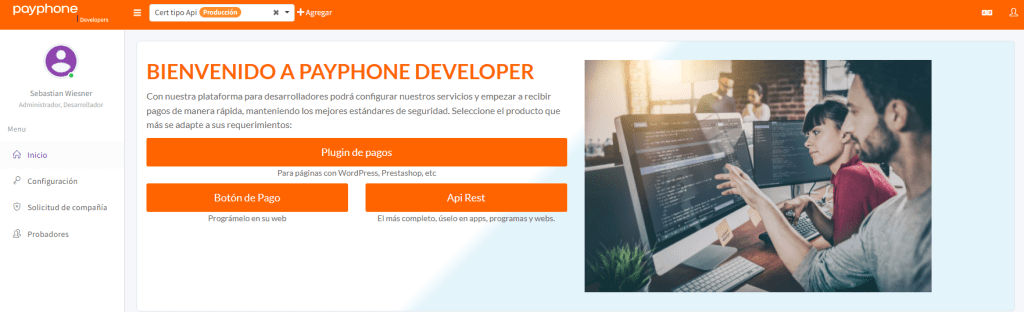
1. Iniciar sesión como desarrollador
Ingresa en la página https://appdeveloper.payphonetodoesposible.com/ e inicia sesión con las credenciales de tu usuario desarrollador (Ruc, correo y contraseña).

2. Create Application Payphone:
Las aplicaciones de desarrollo Payphone te permiten configurar tu ambiente de pruebas, parámetros de conexión o usuarios de test, y te ayuda a obtener tus credenciales de autenticación como el token.
Para crear tu aplicación haz click en el “+” de la parte superior. Si estas actualizando tu express checkout a una nueva versión te recomendamos crear una aplicación nueva.
Se abrirá un formulario donde debes ingresar los campos de tu aplicación, y completar principalmente:
Primero debes llenar los datos informativos, si tu plataforma no se muestra puedes seleccionar la que gustes, recuerda que tu tipo de aplicación debe ser web WEB.
Presiona Guardar
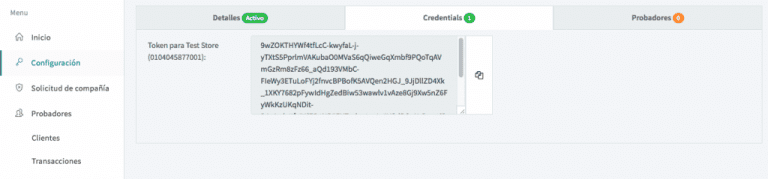
Con la aplicación configurada debes hacer click el menú superior en la pestaña credenciales, y tendrás el botón para copiar tu token..
Integrar el botón en tu sitio web es muy sencillo, solo agrega dos scripts y un tag html para que el botón aparezca.
<script> src=»https://pay.payphonetodoesposible.com/api/button/js?appId=TUIDDEAPLICACION«></script>
        window.onload = function() {
            payphone.Button({

            //token obtenido desde la consola de developer
            token: "TU-TOKEN-DE-AUTENTICACION",

            //PARÁMETROS DE CONFIGURACIÓN
            btnHorizontal: true,
            btnCard: true,

            createOrder: function(actions){
            //Se ingresan los datos de la transaccion ej. monto, impuestos, etc

            return actions.prepare({

                            amount: 100,
                            amountWithoutTax: 100,
                            currency: "USD",
                            clientTransactionId: "identificador-único",
                            lang:"es"

                        }).then(function(paramlog){
                            console.log(paramlog);
                            return paramlog;
                        }).catch(function(paramlog2){
                            console.log(paramlog2);
                            return paramlog2;
                        });
                    },

                    onComplete: function(model, actions){
                    }
                }).render("#pp-button");
            }
En nuestro Express Checkout puedes configurar aspectos gráficos y de comportamiento del botón:
Los datos de transacción los usas para detallar los montos a cobra, la moneda, datos del cliente y referencias que necesites enviar para el pago :
| Name | Description | Data type | Optional |
|---|---|---|---|
|
amount |
Valor total de la factura a cobrar, es la suma de amountWithTax, amountWithoutTax, Tax, service y tip. |
Int |
|
|
amountWithoutTax |
Valor que no graba impuesto. |
Int |
X - solo en caso de que se cobre valores con Iva, es obligatorio si no se cobran valores con Iva |
|
amountWithTax |
Valor que si graba impuesto, sin el impuesto incluido. |
Int |
X - solo en caso de que se cobre valores sin Iva, es obligatorio si se cobran valores con Iva |
|
tax |
Valor del impuesto. |
Int |
X - solo en caso de que se cobre valores sin Iva, es obligatorio si se cobran valores con Iva |
|
service |
Valor del servicio. |
Int |
X |
|
tip |
Valor de la propina. |
Int |
X |
|
currency |
Moneda a cobrar. /ej USD |
String |
X |
|
clientTransactionId |
Identificador de transacción, debes generarlo, es un identificador único. |
String |
|
|
storeId |
Identificador de sucursalr que realiza el cobro, este parámetro se puede obtener en el apartado "Solicitud de compañia" de la página de PayPhone Developer, en el botón lista. |
String |
X |
|
reference |
Referencia del pago que puedes enviar. |
String |
X |
|
phoneNumber |
Número de Teléfono del cliente, si no lo envías el botón lo solicitará al cliente. |
String |
X |
|
email |
Correo electrónico del cliente, si no lo envías el botón lo solicitará al cliente. |
String |
X |
|
documentId |
Número de identificación del cliente, si no lo envías el botón lo solicitará al cliente. |
String |
X |
<div id="pp-button"></div>
Los valores a cobrar son enteros y se deben multiplicar por 100, por ejemplo $1 dólar = 100. A continuación puedes ver un ejemplo de cobrar $1 dólar con impuestos.
amount: 112,
tax: 12,
amountWithTax: 100,
Para cobrar $1 dólar sin impuestos, los valores serían los siguientes:
amount: 100,
amountWithoutTax: 100,
El botón de pago te entrega ciertos datos de respuesta para que tu puedas tramitar el resultado de la transacción y tomar acción de acuerdo al resultado:
Con El statusCode y el transactionStatus puedes mostrar a tu cliente si el pago fue aprobado o rechazado. El resto de parámetros para conciliación, número de transacción y de autorización te recomendamos les des gestión en tu URL de respuesta.
Con esta configuración, tu Express Checkout está listo y tus clientes pueden pagar. Solo te falta configurar tu Url de respuesta.
Para consultar el estado de la transacción, debes crear un archivo en tu URL de respuesta (configurada en tu página de Payphone Developer), esta web es invocada por Payphone en una llamada Servidor – Servidor, enviando los parámetros ID de transacción y ClientTransactionID. Con esos parámetros debes llamar a nuestro servicio web CONFIRM para obtener los datos de respuesta de la transacción.
El método confirma al servicio Payphone que recibiste la respuesta del botón de pagos y así mismo consulta el resultado de la transacción. Debes hacer una llamada POST a la siguiente dirección: https://pay.payphonetodoesposible.com/api/button/V2/Confirm con el parámetro de ID y ClientTransactionID. No olvides adjuntar en el header tu token de autenticación.
Los parámetros de respuesta que recibirás son los siguientes:
| Name | Description |
|---|---|
|
statusCode |
Código de estado de la transacción. 2=Cancelado.03=Aprobada |
|
transactionStatus |
Estado de la transacción. |
|
clientTransactionId |
Identificador de transacción que tu enviaste en la petición. |
|
authorizationCode |
Bank authorization code. |
|
transactionId |
Identificador de transacción asignado por PayPhone. |
|
email |
El correo electrónico empleado por el usuario para el pago. |
|
phoneNumber |
Número de teléfono empleado por el usuario para el pago. |
|
document |
Número de cédula empleado por el usuario para el pago. |
|
amount |
Total amount paid. |
|
cardType |
Tipo de tarjeta empleada, puede ser crédito o débito. |
|
cardBrandCode |
Card brand code. |
|
cardBrand |
Card brand. |
|
bin |
Primeros 6 dígitos de la tarjeta empleada. |
|
lastDigits |
Últimos dígitos de la tarjeta empleada. |
|
deferredCode |
Código de diferido empleado por el usuario. Aquí puedes conocer más de los diferidos. |
|
deferredMessage |
Deferred message. |
|
deferred |
Variable boleana que indica si se uso un diferido o no. |
|
message |
En caso de error se muestra el error en este parámetro. Puedes consultar el catálogo de errores haciendo click aquí. |
|
messageCode |
Message code. |
|
currency |
Moneda empleada para el pago. |
|
optionalParameter1 |
Optional parameter |
|
reference |
En caso de existir, te entrega la referencia enviada |
The following is an example of a PHP web service call:
					 (int)$transaccion,
"clientTxId"=>$client );

$data = json_encode($data_array);

//Iniciar Llamada
$curl = curl_init();
curl_setopt($curl, CURLOPT_URL, "https://pay.payphonetodoesposible.com/api/button/V2/Confirm");
curl_setopt($curl, CURLOPT_POST, 1);
curl_setopt($curl, CURLOPT_POSTFIELDS, $data);
curl_setopt_array($curl, array(
CURLOPT_HTTPHEADER => array(
"Authorization: Bearer TU TOKEN DE AUTENTICACIÓN", "Content-Type:application/json"),
));
curl_setopt($curl, CURLOPT_RETURNTRANSFER, 1);
$result = curl_exec($curl);
curl_close($curl);

//En la variable result obtienes todos los parámetros de respuesta
echo $result;
?>
Y ¡Listo!, Eso es todo, si llegaste a este punto, felicidades, tu integración está completada, en la siguiente sección te contaremos como hacer pruebas y pasar a producción.
Como ya te hemos comentado en Payphone todo el control lo tienes tú, y eres tú quien decide cómo ejecutar las pruebas y pasar a producción. No necesitas ningún proceso de certificación y puedes publicar tu mismo sin problema. Acá te damos una guía.
Tu aplicación creada en la página de Payphone Developer cuenta con dos ambientes pre establecidos que son «PRUEBAS» y «PRODUCCIÓN«. Cuando ingresas en la configuración de tu aplicación desde nuestro sitio de Developers puedes seleccionar el ambiente que necesites.
En pruebas todas tus transacciones serán aprobadas pero no se conectaran las transacciones a ningún procesador bancario, por lo que puedes usar tus tarjetas y no se realizará ningún cobro, o cualquier Visa o Mastercard valida.
En ambiente de producción el comportamiento es el mismo, pero si se realiza la conexión bancaria por lo que las transacciones ya son reales y cuentas con tu botón de pago activo.

Con tu aplicación en producción el proceso está completo, felicidades por integrar tu Express Checkout