El módulo de PrestaShop es la solución perfecta para procesar pagos con tarjeta de crédito y débito en tu tienda en línea. Con nuestro tutorial, podrás activar y poner en funcionamiento tu botón de pago en pocos minutos. Además de aceptar tarjetas bancarias, también te permitirá recibir tarjetas de regalo y saldo de Payphone de tus clientes a través de nuestra aplicación.
Steps to integrate the module
Para comenzar a recibir pagos con nuestro gateway, solo necesitas seguir estos sencillos pasos:
Crea tu cuenta Payphone Business y configúrala.
Instala el módulo de Payphone en tu sitio de PrestaShop.
Configura el módulo.
Empieza a cobrar de manera rápida y segura.
Environment configuration
To configure the module you must meet certain requirements that we divide into two categories: Business Requirements and Development Requirements.
Business Requirements:
El establecimiento que va a recibir los pagos tiene que estar registrado en Payphone Business. Para iniciar el registro puedes hacer click aquí.
Con la tienda activa y lista para transaccionar, debes crear un usuario de tipo “desarrollador“, el cual te explicaremos más adelante.
Development Requirements:
Debes configurar en nuestro sitio web para desarrolladores «Payphone Developer» tu ambiente de desarrollo en donde podrás obtener todas tu token de autenticación con el que te identificas en los servicios de Payphone.
Create developer user
Log in to your Payphone Business account with your RUC, email and password.
Go to the "Users" section and select "Create User".
img-1
Complete the form by entering all the required data and make sure to select the "Developer" role.
img-2
With the developer user created, you are ready to start the implementation.
Payphone Developer
Setting up the development environment at Payphone allows you to manage and monitor all transactions made through the platform efficiently. Follow these steps to get started:
The development applications of Payphone allow you to configure connection parameters, test users and manage your environment(test and production). In addition, they provide you with the necessary credentials for authentication, such as token and StoreID.
Start Creating the Application To begin, click on the "+ Add" button located at the top of the page.
img-4
Complete the Creation Form A form will open in which you must enter your application information. Below are the fields you must complete:
Name: Define a name that clearly identifies your application.
Description: Add a brief description of the functionality or purpose of your application.
Category: Select the category that best matches your business profile.
Development Platform: Choose the platform where your application is developed. If the exact option does not appear, select the most similar one.
Application Type: To integrate the payment button, be sure to select the WEB type.
Web Domain: Enter the URL of your website. It is important that only the registered domain can access the payment button of Payphone. If you try to open the "payment box" from another domain, access will be blocked.
Response URL: Provides the URL to which the user will be redirected once the transaction is completed. This URL will contain the necessary parameters to obtain the complete details of the transaction.
Para el plugin de PrestaShop, la URL de respuesta se muestra en la configuración del módulo. Consulta la imagen (img-9) para más detalles.
After completing all the fields, press the Save button.
Una vez que hayas completado estos pasos, estarás listo para la configuración final.
Configura tu botón de pago Payphone en PrestaShop
Accede a los módulos de PrestaShop: Dirígete a la sección de «Módulos» en tu panel de administración.
Busca el módulo PayPhone: Localiza el módulo que acabas de instalar y haz clic en «Configurar».
img-8
Ingresa tus credenciales:
Token: Copia y pega el token que obtuviste en PayPhone Developer.
StoreID: Si tienes varias tiendas, indica el ID de la tienda que deseas configurar. Si solo tienes una, puedes dejarlo en blanco.
Estos datos se obtiene desde la plataforma de Payphone Developer, en la sección Configuración, pestaña Credenciales como se muestran en la imagen anterior (img-5)
img-9
NOTA: al abrir la configuración del plugin de PayPhone, podrás verificar tu URL de respuesta, que es necesaria para crear la aplicación en Payphone Developer.
Una vez que guardes los cambios, tu plugin estará listo para realizar transacciones.
Interfaz del Plugin Payphone
La interfaz está diseñada para ser intuitiva, facilitando la gestión de pagos y la experiencia del usuario. Verás un diseño limpio y moderno que se integra perfectamente con tu tienda.
A continuación, te mostramos cómo se verá el resultado del plugin:
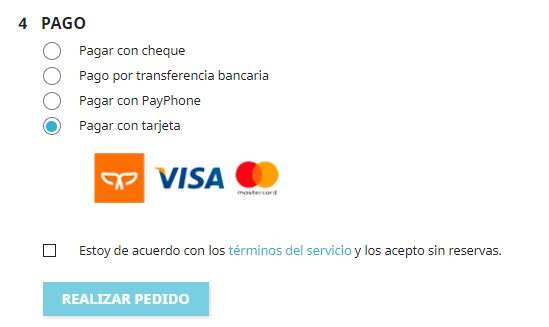
PrestaShop v1.7 y v8. (Botón por redirección)
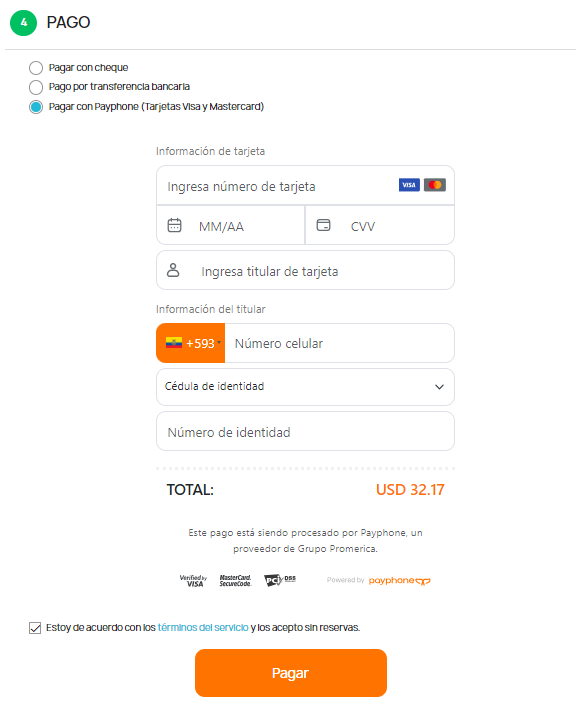
PrestaShop v8 Payphone Box (Cajita de Pagos)
Testing and move to Production
As mentioned above, at Payphone you have full control over the process. You are the one who decides how to run the tests and when to go to production. You don't need any certification process, and you can publish your application independently. Here is a guide to make this process easier for you.
Your application, created on the Payphone Developer site, has two preset environments: "TEST" and "PRODUCTION". By accessing the configuration of your application on our Developers site, you will be able to select the environment you wish to use.
Test Environment: A secure environment to develop and test your application without affecting your users.
In the test environment, all your transactions will be approved, but will not be connected to any bank processor. This means that you can use your cards (valid Visa or Mastercard) without any actual charges being made.
Production Environment: The actual environment where your customers will make payments. Make sure you have performed all the necessary tests before activating this environment.
En el ambiente de producción, las transacciones se conectan efectivamente al sistema bancario, lo que implica que las operaciones son reales y tu botón de pago estará activo.
Once your application is in production, the process is complete.