The Woocommerce plugin is the perfect solution to receive credit and debit card payments in WordPress. Follow our tutorial and in a few minutes you will have your payment button active and functional, besides bank cards it allows you to receive gift cards and balance Payphone from your customers using our app.
Steps to integrate the plugin
To receive payments with our gateway just follow these simple steps:
Create your account Payphone Business and set it up
Installing the Payphone plugin on your Wordpress site
Configure the plugin
Start charging
Video Tutorial
In the following video you can see how in just a few minutes you can integrate our plugin
Environment configuration
To configure the plugin you must meet certain requirements that we divide into two categories: Business Requirements and Development Requirements.
Requisitos Comerciales:
El establecimiento que va a recibir los pagos tiene que estar registrado en Payphone Business. Para iniciar el registro puedes hacer click aquí.
Con la tienda activa y lista para transaccionar, debes crear un usuario de tipo “desarrollador“, el cual te explicaremos más adelante.
Requisitos de Desarrollo:
You must configure in our website for developers "Payphone Developer" your development environment where you can obtain all your authentication token with which you identify yourself in the services of Payphone.
Create developer user
Ingresa en tu página Payphone Business, e inicia sesión con el ruc, correo y contraseña, (si no tienes acceso, el administrador de la empresa puede entrar y crear tu usuario) y dirígete a la sección de «Usuarios» a continuación selecciona «Crear Usuario»:
Ingresa todos los datos del desarrollador en el formulario, no olvides que en el campo «Roles» debes ingresar «Desarrollador». (El administrador debe entregarel correo electrónico y la contraseña ingresadas)
Con este proceso listo, el usuario desarrollador puede iniciar la implementación.
Page Payphone Developer
Configuring the development environment allows you to have full control over the transactions made through Payphone. Please follow the steps below:
The development applications Payphone allows you to configure your test environment, connection parameters or test users, and helps you to obtain your authentication credentials such as the token.
To create your application click on the "+" at the top:
A form will open where you must enter the fields of your application, and complete mainly:
Dominio web: La url de tu página web que se conectará al botón de Payphone. SOLO EL DOMINIO WEB TIENE ACCESO AL BOTÓN DE PAGO, si no abres el Express checkout desde tu dominio web, no te dará acceso.
Response url: It is the url where the status of the transaction will be notified. You can find the response url at the top of your plugin configuration that we will see later.
Finally select your application type as WEB
Press Save
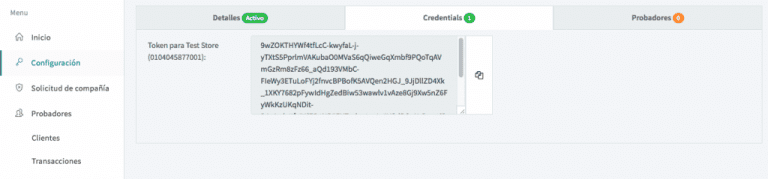
Obtain authentication token
With the application configured you must click the top menu on the credentials tab, and you will have the button to copy your token...
Install and configure plugin
Perfect, with your application created we can start the configuration in WordPress. Remember that you must already have the Woocommerce plugin installed. Go in your WordPress dashboard to the plugins section, then Add New and look for the Payphone plugin.
To configure your button you must provide the obtained token, enter the PayPhone settings in the plugins section and enter the obtained token:
Note: The StoreID field must be empty, unless you have multiple branches created in your Payphone Business store.
If you manage branches enter the Sotre ID which is obtained from the PayPhone Developer web page, in the Company Application section, Actions column, Store List. If you do not manage branches leave the field empty.
Remember to configure your woocommerce store so that the charge is according to your billing type, that you have configured the VAT or 0% rate according to the requirements of your company.
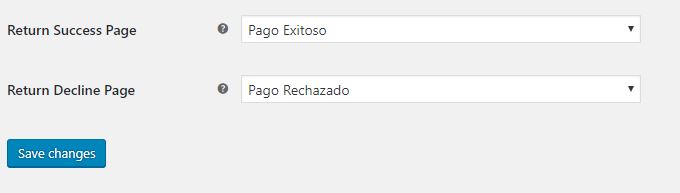
Finally, configure the pages to which PayPhone should go when the payment is successful or rejected:
After saving the changes your plugin will be ready to trade.
Testing and production
As we have already told you in Payphone all the control is yours, and you are the one who decides how to run the tests and go to production. You don't need any certification process and you can publish yourself without any problem. Here we give you a guide.
Your application created on the Payphone Developer site has two pre-established environments which are "TESTING" and "PRODUCTION". When you enter the configuration of your application from our Developers site you can select the environment you need.
In testing all your transactions will be approved but no transactions will be connected to any bank processor, so you can use your cards and no charge will be made, or any valid Visa or Mastercard.
In production environment the behavior is the same, but if the bank connection is made, the transactions are already real and you have your payment button active.
With your application in production the process is complete, congratulations for integrating your Woocommerce plugin.